Quantcast
Channel: Lisa Freemont Pages
Viewing all 103 articles
Browse latest View live

Thursday Check In- Fitness for the New Year

$
0
0
I,like everyone else in the universe, have decided to get 'fit' this year. I find that although my calorie intake is very low and I remain pretty active, this simply isnt enough anymore to keep the inches away. I have gained inches since my 'detox cleanse' post and it's most disconcerting. Mostly, I think this is due to a high-stress busy lifestyle that makes taking regular meal breaks 'inconvenient' and therefore I tend to push all of my calories in, at the end of the day. Even if you are keeping your calories down, this is never a good thing, and prevents your body from recovering and using those nutrients as it should.

So my new goal for the year is eat smaller meals and make healthier choices, in addition to exercising in a more focused manner.

When it comes to diet, I don't necessarily feel that a drastic lifestyle change is in order, nor do I feel inclined to start eating Vegan or Gluten Free. I do my research, I buy organic when I can, I make balanced meals, and I try to do all of this on a tiny little budget. I have started incorporating Kale Smoothies in my diet, which give me tons of energy, and are an excellent way to get my veggies since I'll admit to being lazy bout expanding this part of my meal planning. Every week, we have a grill night, a taco night, and a soup night. This makes menu arranging much easier and Pinterest comes in very handy for finding recipes that meet these categorical requirements but also feature new and interesting veggies. It's how I discovered how much I loved grilled brussel sprouts and homemade fish tacos. So I do feel that this part of our health is headed in the right direction and as long as I don't keep candy and chips around the house, I think I can keep things under control. My main issue, like I said, is pushing eating to the side until I'm famished, which will naturally result in my eating far too much and too quickly.

photo by Celeste Giuliano

When it comes to exercise, I have not been as focused as I should be. I allow things to get in my way far too often and I don't have specific goals. Therefore, I think keeping my goals small and my workouts more 'pointed' when it comes to reaching that goal, will be the key. I will be continuing to utilize the 100's workouts, which boast excellent results, alternating them with my favorite trainer, Cathe Friedrich's, fitness videos.

Every Thursday, I'm going to try to check in here, to report changes in inches, weight, or routine. Hopefully I can stay on track and not lose steam, especially since Viva Las Vegas is in April and provides a really good 'checkpoint' to work towards.

Right now, my weight is 130 lbs.
My bust measures 34 inches
My waist is 30 (the largest it has been since my children were born)
And my hips are 39.

I don't have much faith that my bust measurement is likely to change much, so I use a padded bra and inserts to bump it up to 36. But the waist and hips are more manageable and hopefully can be whittled a bit.

My goal is to get my waist down to 28 and my hips to 38. I'd like my weight to stay the same; around 128-130 is fine with me. This definitely isnt a journey of weight loss. Just inches.

Til next time,

So Long, Dearies!!
xxoo,
Ashley

Thursday Check In: The Viva Fit Club

$
0
0
This week is 'shaping up' nicely. See what I did there? ;-)

I started out the week with a busy Monday that didn't allow time even for a work out. I soothed myself by eating healthy and trying my best not to slack up.

Thankfully, Tuesday-Thursday have been right on routine and I've been staying within my nutrition goals as well as spending a good 30-45 minutes exercising. I have been struggling with how much to alter my calorie intake according to my fitness goals. I've done some research and find that if I keep my calorie intake to 'maintain' my weight and 'lift heavy', I would lose inches instead of pounds. Unfortunately, it isnt in my budget to purchase weights so I'm sticking to strenuous calisthenics for now. I'll be wrapping up my week with Pilates. So its three days of cardio and two days of resistance training for now.

We'll see how that goes.

So far, no inches lost...2 lbs down.

Til Next time,

So Long, Dearies!

xoxo
Ashley

Pre-Viva Fitness Check-in

$
0
0
So here we are, one more week closer to Viva.


I am happy to report that even with a small hiccup in the form of a weekend trip to Middle Tennessee .featuring tons of delicious food and homemade wine, I had no trouble getting back on track this Tuesday, when I returned home.

Food: I'm keeping my calorie goal at about 1600, which is what My Fitness Pal claims is ideal for maintaining my 129 lb weight. I am not currently compensating for burned calories by taking in any extra so if my workouts begin to result in weight loss, I may have to add another snack. I drink one Green Smoothie a day, using leafy greens like spinach and kale to increase my vegetable intake. I plan to purchase some protein powder this weekend because it's really the only thing my shakes are missing. I drink the smoothie at either breakfast or as an afternoon snack for an added energy boost. My meals focus on clean foods and I'm trying to keep them low in fat as well.

Exercise: I've increased my Wed-Fri workouts to 45 minutes each, to maintain my fat burning zone a little longer than previously. However, once a week (usually Tuesday)I still do the 30 minute 100's workout because I really think it is a great challenge to jumpstart the week. Mondays are busy for me so I force myself to walk or take a bike ride so that I am still doing something active.

Results: I have not yet lost any inches and am down from 131 to 129 lbs. I have noticed that my clothes fit tighter in my butt and I think that this is due to the squats and other leg exercises I've been doing. I don't anticipate it becoming a problem though since I am not working to 'build' and this increase is rather just a result of toning the area. I have always been known to have a square butt so a little roundness there can't be a bad thing!!

Til next time,
So Long, Dearies!!
xoxo
Ashley

Vintage Hair for the New Year

$
0
0
As I get older, I am becoming ever more infatuated with the easy side of vintage styling. After all, my chief inspirations- Grace Kelly and Ginger Rogers, have always been gals who boasted soft, blowsy,and casual waves in their day to day life. This is probably typical of most vintage enthusiasts today and I'm presently clinging to that aesthetic myself, especially faced with the onslaught of tasks and duties that crowd my 'to-do' list each morning.

So I thought I'd use this post to showcase some of my favorite easy hairstyles in my 'vintage hair inspiration' folder, the ones I plan to use often in this coming year for all occasions.

The casual vintage look always starts, first and foremost, with the cut. A good quality layered cut is a 'must' to accomplish that breezy look in some of these photos, but still look 'put together'. When you are doing elaborate rolls or up-do's every day, it's easy to hide a less-than-perfect haircut. But when you're doing a basic wet set at night and relying on a simple brush-out to carry you through the day, the manner in which your hair is tapered and snipped can make or break the effect. So if you must do your own color at home in order to afford a talented and reputable stylist, like me, then let it be.

Now on to the hair goodness!

1. The Signature Grace:
It's no wonder that this would come first, especially since my 'journey to grace' is nearly complete. I am still not quite this length yet. I realized after I got to the salon that there was still a few things I wanted to do before I went to this shoulder brushing length. I'm a few inches past my shoulders right now. But what I love about this style is how it can be smoothed for a more formal evening look and kept breezy and loose for day. Add a flower to freshen it up even more.


Mini Tutorial:
To achieve this style, use foam rollers or large pin curls aimed away from the face on all sides. Allow to dry and brush thoroughly.

2.The Rolled Partial Up-do:
So this is victory rolls-my style. As most of you know, I adore rolled hair styles but the modern voluminous ones don't really flatter me much. My favorite looks with rolls tend to be partial up do's that softly blend rolls and waves. This look is a variation on one of my favorite styles, which I do often. Mine usually involves one assymetrical roll with a side comb but the aesthetic is very similar.

Mini Tutorial:
Roll hair using your desired method. Separate top and sides into three sections and use combs and bobby pins to secure dry pin curls as you wish. No teasing necessary unless you want extra volume. Spray each section with a good hair spray before rolling to keep the rolls as clean as possible.

3.Center Parted Curls:

Center parted curls are aways retro and glamorous. With loose waves and longer darker hair, the look is really 'vampira'-esque. With a short bob like Ginger's, the look is still coquettish but also very wearable and chic. For a casual daytime look on center parted hair, pull the hair back into side combs and secure so that the front sections are evenly placed on both sides of the part. This works for naturally curly hair or hair that has been set into waves.

Styling Suggestion: This was a popular look with Hawaiian dresses. Symmetrical realistic-looking flowers placed above each ear immediately lend a Dorothy Lamour quality to this style

4.The 60's-era Faux Ponytail:
Of all the fake hair options available today, nothing is quite as simple as the faux ponytail. The look is timeless and by turns, elegant and playful. Just stick your hair into a simple bun, clip in the ponytail, and voila! Instant length and volume!

5.The Easy Updo:
There are scads of complex rolled up do's online and in vintage photos of the 30's through the 50's. But more often than not they are a headache and don't really work into most busy routines. Therefore, netted styles like the one worn below by Gene Tierney:


...or a simple chignon coupled with a faux braided crown around the head:


...can be life savers! The faux braid is great for evening-wear. For a less elaborate similar look in summer time, wear your own hair in peasant braids!

Mini Tutorials:
For the net: Using an invisible net from your local beauty supply store, part previously styled hair on the side, using pomade to smooth it down. Tease the hair below the ear and place into the net. Pin in place and use flowers to add some embellishment.

For the peasant braids: Part hair down the center, braid in two tails, aiming upward. Pin in place in a crown , making sure to secure the loose ends under the braided sections.

These are some of my favorites. I hope you all enjoy them as well.
xoxo,
Ashley


Pre-Viva Fitness Check-In

$
0
0
And it's time for another Fitness Check-In, here on this fine Thursday. It is freezing here in Memphis and we Memphians are not used to cold, really. As you may or may not know, a winter in west Tennessee tends to fluctuate between sort of cold (40's or so) rainy weather, a warm snap where it gets up to the 60's and everybody gets sick, and a few winter storms. This winter, the storms have missed us but the cold spells have been insane. Today it is 22 degrees and I am sitting by my heater all day. But I DID work out, as this post will discuss, and am feeling pretty proud of that fact.

This week, I am finally showing some progress! I have been careful to keep the calories down and work out regularly, and although the scale still shows 130 lbs, I have lost an inch in my waist and hips So the waist is at 29 and the hips are at 38! So I am already to my goal in my hips and halfway there in my waist!

Visually, I don't observe much change but my butt is a little more pokey. That's never bad for a gal who was called 'SpongeBob Square Butt' at one time. ;-)

I should also mention that I saw an episode of The Brady Bunch a while back where Mike Brady was doing calisthenics before bed and this inspired me to do the same. How can you NOT be inspired by Mike's curly head and striped pajamas?? So, right before I jump in the bed, I do 20 leg lifts (10 on each leg), 10 deep squats, and 100 twists. The latter is in an effort to help stretch and slim my waistline. I do notice that my clothes fit a little better but that might be due to the work outs I'm doing during the day; I don't know if the bedtime stuff really does any good. But it was worth mentioning.

Til next week,
So Long, Dearies!!

Ashley


Pre Viva Fitness Check In-Week Five

$
0
0

So here we are in week five.

Not much to report. I slipped up in my work out schedule due to a lot of unusual appointments this week. Kids to the doctor, Parent Teacher conferences, etc. And my Monday bike ride was hindered by extreme cold. So today was my first work out of the week.

I did my Cathe Friedrich step routine, as part of my cardio rotation. I absolutely LOVE Cathe's instruction style and her work outs are all challenging and efficient. I feel so much more 'fit' after I've stuck with a step program for a while than using any other method. I've heard a lot of negative things about this type of workout, that it's dated etc. Do I really look like someone who is worried about 'dated'? :-)


Anyway, I've been working out with Cathe since 1997 or so, so I kind of consider her my personal trainer. I wouldn't want a home program without her.

Foodwise, I've been doing pretty well. Making better choices, keeping the calories down.

No more inches lost but I'm okay with that.

Til Next Week,

So Long, Dearies!!


The Week in Freemont Street: Rockin Rollers and Fitness

$
0
0
Ifeel like I've fallen out of touch with blog-world and it's a shame really, because blogging was my first online love. I miss checking in with my fellow beauty bloggers, and discovering new sites and styles with them. I guess I've put a little too much time into thinking about what might be an interesting to my readers and not enough time just diving in!

So here you go,a written, easily accessible link to what I've been doing all week in the way of fitness, style, and shenanigans.

I've been promising all of you a written review of those awesome little dealios called 'Rockin' Rollers'. I've been using the holy heck outta these things recently and a video tutorial was a must:


But without having to trudge through a tutorial for the sake of a review, here is the long and short of it:

These are the same rollers you've seen in the drugstore under a different name, repackaged by Lauren Rennells, the author of the book: Vintage Hairstyling. I trust Lauren's opinion wholeheartedly so I was especially pleased to see that she had written an easy-to-follow instruction booklet to accompany the rollers, including tips on how to use the rollers as a hair filler for elaborate styles.
My first thoughts were that I didnt think something that snaps in place can possibly stay put in my slick, fine hair. And in some ways that's true, since rolling my layered hair up while dry was next to impossible. But once I got the hang of it and texturized my hair a bit with some mousse and setting lotion, rolling it up was pretty easy. Snapping the ends together and linking the following roller to it, like a chain, also gets easier with practice. The end of the roller is also pretty flat so it can be pinned in place with a bobby pin to prevent slipping.

Sleeping on these rollers is a cinch. I put an invisible hair net over the top to keep them still and the next morning, they had not budged an inch. Hair that has been sprayed moist dries very quickly due to the porous fabric casing and they're very comfortable while snoozing.

The real appeal, however, is undoubtedly the results. The curls are tight but shiny, bouncy but durable. Even in my high humidity environment, the set was long-lasting and even though there are only 12 rollers, there were plenty to provide a variety of curl types.


So obviously I'm a big fan of these things and I absolutely feel that purchasing the ones on Lauren's site are worth the extra money. Not only because I want to support this lady in all she does, but because I doubt I would have given them a chance if her nifty booklet hadnt beckoned to me.


Product Score: 9/10
________________________________

Belated Fitness Check-In

Viva Fitness Check-In: Weeks 6 and 7

I missed a week in my plan to report weekly about my Fitness progress. During that time, I revisited the Dr Oz 3-day Cleanse. I still feel it's a great way to reboot the system and if you can curb your eating habits when you are done with the cleanse, can really jump-start good habits. I feel more fit than ever; I can get through the 100's workout without even getting very winded, and although I haven't measured my progress in inches lost, I can feel that my clothes are looser. I even bought some new underwear, to celebrate!

So that was the week in review.

Til Next Time,
So Long, Dearies!!


Lady Marlene Bra Review

$
0
0
In the interests of finding a good vintage-shaped longline bra that also provides good support to the waist, I came across this one and thought it deserved some blog-time. 'Came Across' is actually a stretch of a statement, since actually Katherine, the extraordinary designer of Whirling Turban dresses, is the one who referred me to it.

The problem with the Goddess Bra I have been using is that it comes up pretty high on my chest, which means my Whirling Turban pieces as well as many of my vintage tops fall a bit below the bra line and it peaks a bit. :( I have edited this out of many photos but you can see the bra in some of my Viva photos for sure. So I opted to find a black bra, but also a slightly different style.

Before purchasing the Lady Marlene, the Goddess Longline bra with a Rago Waist Nipper over the top of it has served me really well. The bra provides the clean vintage line without that signature padding prevalent in so many of today's modern bras, and the waist nipper gives me a lot of great definition at the waist. I discuss the pairing of these two items in more detail in this video:

)

But again, the height of the Goddess sometimes presents a problem, so Katherine suggested the Lady Marlene in Black to see how it suited me. The style number she recommended was the 986, as unfortunately not all the longline bras from this company are created 'equally'.

The 986, unfortunately, is DIFFICULT to come by. It seems to have been discontinued so is really only available at a limited number of boutiques and sellers on Ebay. The Ebay sellers I checked had it in my size, but not in the right color. I finally found it through the following shop, which I had not heard of previously, and so although I was worried about ordering from a company with which I was unfamiliar, I went ahead and splurged on the bra.
http://www.alexis4u.com/Lady_Marlene.htm

I paid a pretty good price of 69.99, and the bra arrived quickly and was indeed a new item with tags.


FIRST IMPRESSIONS:

At first glance, the bra looked different than the photos I'd seen. There is no 'nude' lining or sheer effect on the one I received,which I'll admit disappointed me a bit since it's the prettiest thing about the design, in my opinion.

That said, it looked very true to the photo otherwise and all the seams, garters, and closures were excellent quality.

The cups are not set extremely close together, which might be a problem if your breasts are situated that way, but since mine are more spaced out, the cup design was perfect. The elastic panels at the waist seemed very resilient, as if they would hold the mid-section in place much better than Spanx or the like. The zipper is placed OVER a set of hook and eye closures, so there is extra security as well as integrity to this portion of the bra, a key factor for front-closure bras or bustiers. The length is much longer than my vintage longline or Goddess bra, which both cut off at my true waist, and truly does mimic the look and length, at first inspection, of my Goddess coupled with the Rago I mentioned previously.

FIT:

To my satisfaction, the bra fit exactly as it should and has a lovely supportive shape that is perfect for strapless or backless vintage designs. It has a smooth look beneath clothes, the closures hold up excellently after hours of wear, and the garter straps are of the same quality as my Rago items... another plus! I always have to fill out cups without padding (these cups are lined, but not padded) using silicone enhancers, and this is true of the Lady Marlene as well. But I feel very supported in this bra and in my opinion, it's an extremely attractive option for vintage clothing!!

CONS:
My only complaint with this bra is that, although the elastic panels at the sides hold me in nicely and give me a very smooth line beneath clothing (much better than Spanx), the waist is not the best for definition. So my Goddess/ Rago combo is still the best for items that fall at my true waist and which can make me look a little thick in the middle if I don't help them along.


All in all, if you can find one, I say snap it up! It's a worthy investment for fitted bombshell styles and better than any other bra I've seen for low-backed gowns and tops.

More later, Dearies!!

xxoo,
Ashley


A Beginner's Guide to Viva Las Vegas-The Rockabilly Weekender

$
0
0

For a few years now, I've been meaning to provide a nice little compact 'guide' of sorts, for those who may be attending the VLV Rockabilly Weekender for the first time. The event has become synonymous with Car Culture, vintage lifestyle, and Rockabilly Music, so it continues to gain in popularity.

I went to my first VLV in 2007, when the event still took place predominantly at The Gold Coast, and I've seen it grow and improve over the years. However, I've also seen it become a bit of a nuisance in certain areas, so much so that many people have chosen to avoid it altogether rather than deal with the crowds, security, and media frenzy involved. I've seen the vintage style I love so much become no more than a novelty that is exploited by tourists and hotel staff alike. However, it is still possible to enjoy the Weekender, and hopefully this guide will provide some valuable hints that will help make your first Viva a good one.

If you follow my Youtube channel, you have likely seen my Packing Video and 'First Timers' videos that were posted this week. All (or most) of this info is available there. I have opted to create this written post for those of you who prefer this medium, but I will post links to those videos also, at the end of this entry. :)


So without further ado:

1.PLANNING:

First, download the free App for Viva. It's a huge time-saver when it comes to both planning and attending. The schedule for all the events is readily available, as are running updates on ticket prices and added entertainment. So that's a no-brainer.

Next, check the schedule and determine what you definitely want to do. My husband has definite acts he likes to see, so it's important that I know how to plan our time with that in mind. So plan your itinerary with the others in your group and if you have different tastes, you can plan to mesh your schedule where you can and separate for some things. If you want to see the Fashion Show and your fella or room mates want to head to the pool, don't sweat it. Do your thang. Let them do theirs. Everybody wins.

If you're going, as many of us are, principally for the music, don't tie yourself to just the acts you know. Look them all up on Youtube and you may be surprised what you find! I tend to always look up the acts from Scandanavia first; I am utterly thrilled by the grasp of American music that the groups from these countries showcase. I also love to research bands from Japan, where so much of the most authentic Rockabilly music is surfacing, and this year, I discovered a fella from Germany who just tickles me to death. :)


So take some time to give the bands a listen!

If you are a fashion lover, and the vendors are your driving motivation, I cannot stress enough how important it is to BE THERE WHEN THE VENDOR ROOMS OPEN! It's hectic, yes. It's mayhem, yes. But it is SO worth it. The best vintage items will go quickly so to have your pick of the litter, you must be on hand, be bold, and have some cash. Some vendors won't wait for you to go to the ATM. That perfect circle skirt is only yours if you can pay for it, friend.
Head for the vintage vendors first, since those pieces are one-of-a-kind. If you love something, buy it then. Don't wait. If you like something, but want to hold off...I say wait for Sunday when prices tend to go down. Do not, especially on Thursday, try to bargain with the vendors too much. These people have paid great expense to be there and most of them sell vintage every day, so they are pricing it according to what it's worth to THEM to sell it. Keep that in mind.

I usually buy reproduction or vintage styled garments that are manufactured in larger quantities at the Car Show. It's just more fun to shop there, I'll admit.

Finally, begin making your list. I put mine together thusly:

At the top of my list, I usually put all pertinent information to my trip: Confirmation numbers, flight information, this year's instructions for obtaining your pass etc. Losing this info is a big party -pooper, so stay on top of it!

Next comes anything 'tech' related. Cameras, computers, cords, batteries, chargers. I do not need to be without these things. Part of my trip is business related so this info must take precedence if I want to avoid unexpected expense and hiccups.

After the electronic devices, comes items I'll be carrying on the plane or in my purse. Books, sunglasses (I bring pairs in my luggage as well), phone, snacks etc.

Then comes the real list:

TOILETRIES


Go through your bathroom and write down EVERYTHING you use on a regular basis. Try not to miss anything, even small things like a headband to hold your hair back when you wash. All items from Shampoos to toothpaste to prescriptions go on this portion of the list. Where you CAN, buy travel toiletries to save space in your luggage.Don't forget feminine products if that will be an issue on your vacation, and pack a heavy weight conditioner and body lotion just in case the dry climate makes your hair unmanageable or your skin tight.

FIRST AID/EXTRAS:
The dry climate presents quite a few issues that I did not anticipate. There are also some 'good sense' things to consider. Here are a few items I recommend for the trip, in this category:

1.Headache Meds (Someone you meet or know will want them.)

2.Spray Deoderant (this is a perfect way to keep blisters as bay, when you use it on your feet. Prepare for the walking in any way you can.)

3.Moleskin Padding: Bring along a little pair of scissors to cut the padding to fit over 'hot spots' you develop on your feet. The best way to prevent blisters.

4.Blister Bandaids: the ones for this purpose keep out water, if you go swimming, and protect and heal the blister faster.

5. Water: (no, don't bring a 12 pack on the plane with you, but stock UP at a local market before arriving at the hotel and keep it handy in your room. For every alcoholic beverage you consume, drink 8 oz or more of water. It's so IMPORTANT to stay hydrated in the desert!)

6. Sunblock: Go for a high SPF so you can stay in the sun longer. The hotel is chilly...it is NOT FUN to walk into those hallways with a sunburn. Brrrrr!

7. Eye Drops: Moisturizing eye drops are a great choice for keeping the red out of your cat-eyes.

8. Saline Nasal Spray: Don't buy Afrin! Just the simple 'Ocean' spray is what you need to keep nasal passages clear and non-irritated.

9. Protein Bars: Drinking champagne late and eating dinner early can make you queasy in the morning, even if you don't overdo it. Protein bars in your suitcase will get you ready for the day even better than the first cup of coffee.

10. Sewing Kit: For unexpected button or hem problems.

11. Safety Pins: You or a friend will be forever glad you remembered them.

12. Cozy socks: for the hotel room...carpets are nasty,ya'll.

13. Preparation H: For puffy eyes, in the morning. Yep. I said it.


Once you get this stuff in check, move on to:

STYLING PRODUCTS/TOOLS:

Again, take stock of what you use regularly, over the course of a few days. If you're planning wet sets, make sure to pack a good setting solution. For a heat setting, include a heat protectant. This section of the list is also where you'd put hair accessories (consider which ones you really want to use, so as not to overpack), bobby pins, curling irons, pin curl clips, and hair spray. For the latter, I don't recommend a travel sized option since you're likely to use more than that with all of the 'dolling up' you'll do.


If you're planning to use rollers and pin curls as your principal setting, don't forget to bring a heated set or a curling iron as 'back-up'. You can't be certain how your curls will turn out if you've never experienced desert weather.

CLOTHES


Now it's time to plan your outfits!

As tempting as it may be to just throw your favorite stuff in a suitcase and decide what to wear on the fly, it will likely not be your best option for Viva.

Don't limit your fun by wasting time with making decisions! Plan your outfits and be done with it!

This portion of the guide will help you figure what is best for certain events. Then you're on your own..
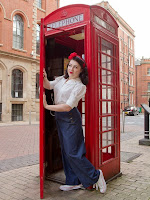
For Daytime Events:

Go for stylish floaty comfort. Wear shoes that have been well broken in, since this is when most of your walking will take place. If you are most comfortable in pants, playsuits, and shorts, rest assured you won't be alone. Carry a sweater for your strolls through the hotel but carry a large bag so you can store it away when you're outside.

Below are some examples of past Viva Daytime Attire:

Thursday Afternoon:


Friday Afternoon Pool Party:


Saturday Car Show:


Sunday Pool Party:


For Evening Events:

For evening, you can go a little more formal, a little bolder. A bit of sparkle never hurt anyone in Vegas. So feel free to explore fashion that would be entirely too garish at home. Here are some evening attire pics at VLV, to inspire you:

Thursday Evening:

Friday Evening:

Saturday Evening:

Sunday Evening:


PACKING:

Once you've planned your outfits, move on to packing.

I get my planned clothing cleaned in plenty of time, so that I can keep those items put aside for about a month prior to packing. I am no packing expert, but I find that by putting shoes in the bottom of the bag, filling in the space between them with smaller items like underwear, really saves space. Also,put your foldable items in large gallon ziploc bags, squeeze all the air out, and place them on top. Place toiletries in a hanging organizer, to keep them together, and anything product-wise that doesn't fit, can go into the pockets of your case. But MAKE SURE that they are placed into a plastic bag first, so as to prevent leaks during travel.

AFTER YOU ARRIVE:
Obtain some cash, if you haven't already. Separate food money from spending money and plan how much you'd like to spend each day. Keep large cases of water in your room along with beer or any other beverage you plan to consume in larger qualities.

I always unpack as soon as possible to help my clothes recover and feel more 'settled'. I detest living out of a suitcase, so to speak.

Anyway, that about covers it!

Here are the links to the videos I mentioned earlier in this post:
Viva for First Timers
Viva Packing Video

Hopefully this helped some of you! I hope that your first Viva will be amazing and that these tips contributed to that somewhat. And I hope you find some time to relax as well.

It's a vacation after all!


Til Next Time,
So Long, Dearies!!

XXoo,
Ashley

Pre-Viva Fitness Check-In, Final Entry

$
0
0
I am so ASHAMED that I have not done a check-in for this topic since January! as some of you may know, I tend to start a regular feature here and then slowly abandon it due to lack of time. So I do apologize to those of you who were counting on this feature, or perhaps using it to share motivation!

I have been very busy with my Pre-Viva videos on YouTube and family responsibilities. But I have been trying hard to stay on track with my fitness goals in spite of unexpected events and even a trip to New Orleans!

As far as my measurements goal, I think I'm destined to have a 29 inch waist. I know it has been 28 inces in the past, but even though I can feel the muscles becoming firmer beneath that stubborn layer of loose skin etc that will persist, in spite of countless crunches, the measuring tape remains unchanged. So I will be content with that.

My fitness level has improved considerably since I started doing more of the HIIT Cardio routines on Fitness Blender. My squats are deeper and my endurance has greatly increased. The butt of my jeans feels tighter; I consider these all good things.

My water intake has increased as well, and starting March 17th, I have been mostly 'dessert free', other than the brief trip to Louisiana of course. I'm keeping my caloric goal to 'maintaining' level, but not replacing the ones I burn, so that I can continue towards losing those last few pounds. If it happens, great; if not, I have no intention of stopping. There is so much to be said for getting healthy!

I'm determined that even the 'Post Viva Blues' will not hold me back!!

So for the time being, this Check-In is complete. I will catch you on the other side, friends!

Onward and Westward,

Ashley

Fashion Feature: Queen of Heartz and My Doris Day Dress!

$
0
0
In the weeks since I returned from Las Vegas, so much has prevented me from putting up this post. So here I am promoting and praising a company's Spring collection when the season is nearly over.

That said, I don't think it matters much since these dresses are suitable for summer as well, and the swimwear this season is just fantastic!


In addition to whimsical cotton prints, the evening appropriate items are still available and there is a wide range of bridal styles to suit your summer wedding!


However, I felt I must use this entry to showcase my own Queen of Heartz Spring/Summer frock that I commissioned from Letty just before Viva. I had always been inlove with that gorgeous blue floral dress that Doris Day wore to the Moroccan Restaurant in the Hitchcock classic, The Man Who Knew Too Much.

The Edith Head original was meant for evening; I believe it may have been made of organza. It is so so stunning. I especially loved the square cut of the back and the seaming that trims the neckline.


I wanted a day dress made from a sturdy cotton, that had a similar print. Letty sketched up a design and went straight to work. I got the dress just before Viva and loved it!


The cut of the bodice is very similar to the inspirational design, with the same lovely seaming that traces the neckline.

The fabric is a muted and vintage appropriate floral that could not suit my vision better. I'm especially fond of the back. The wide-set straps just brush my shoulder blades and frame my upper back cleanly and modestly.


The feel of the fabric is luxurious and heavy, but not stiff, and still appropriate for warm weather.


So don't forget the option of having something customized for you, if you visit the Queen of Heartz website and have something specific in mind! I have ten more dresses on my wishlist that I might just have to send her way eventually!


xxoo,
Ashley


Product Review: Suavecita Pomade

$
0
0
A few months ago, the fellas from Suavecito contacted me, probably based on my reviews for similar products on Youtube and here. I suspect that they wanted to get their feminine pomade in the hands of as many bloggers as possible, which I respect.

So for the duration of this review, let's forget for a moment that I am a die-hard advocate of Layrite, for both males and females. Let's forget I ever sold it, reviewed it, or formed a friendship with the creator and his crew.

A product that is promoted as being specifically for a female stylist should stand on its own and not need to be compared to anything else and I'm sure that's why they gave this to me to try.

So let's start with the packaging:
The signature skull-faced logo with the cute victory rolls is eye-catching, for sure. But in my mind, it seems very targeted. Uncomfortably so. I can't imagine a conservative vintage lover in her 50's, with no knowledge of the west coast rockabilly scene, sitting at her antique dressing table and reaching for this container, or leaving it out on display to accompany her heirloom lady-head vases and sterling brush set. I personally prefer a more subtle packaging with a classic feel, even in a disposable product. For ladies, I prefer a neat,clean design and ageless appeal. This doesn't really have that, in my opinion.

The fragrance: At first sniff, I was puzzled by how strong the fragrance hit me. It calls to mind a hairspray, not a pomade, and there is a hint of alcohol there that is hard for me to ignore. After application, the odor lingers and I found that even my wonderfully scented (in my opinion) Vintage Hair products (from Sally Beauty)could not overpower it. This is a big negative for me, because I love the scent of my shampoo and current styling products, so I don't want my pomade to cancel them out. :(

The product: This is advertised as a light-hold item and makes the following claims:
____________
Suavecita is designed to be versatile in achieving any number of the following tasks:

Texturize Hair
Eliminate Fly Aways or Frizziness
Add Shine
Polish Curls & Waves
Sculpt & Hold Form
_____________

My thoughts:

I didn't find it beneficial for texturizing since its slick texture dries quickly and makes the hair difficult to work afterwards. It leaves a bit more 'crunch' than I'm used to, and I did see some flaking after a few hours of wear, so very light application was necessary to combat that. This is true of most water soluble pomades however, so keep that in mind when working with them.

It does eliminate fly-aways and frizz, but for thick or textured hair, I would probably suggest a more emollient product, something perhaps with an oil base that will condition as it tames. This will dry over time and stray pieces or hairs will likely begin to stray a bit. The same is true of the shine, which is lovely to start, but tends to dull as the product dries. For those of us with thin, fine hair, this is a great product for shine, to start, but I would always suggest topping it off with a dry oil spray as well, so the shine lasts.

It's a decent option for polishing curls and waves, but again, use a light hand because the product can pull out the waves on us straight-haired ladies if you overdo it.

For sculpting and holding more elaborate rolls, I do like the result. The only thing I'd recommend is that you not try to brush through straight or fine hair after application, using it instead to mold and shape existing rolls with your hands. Attempting to re-style hair after applying this pomade could cause problems.

That's about it. It's not awful, but the scent and the dryness are pretty big drawbacks. All in all, I'd suggest getting a sample before you splurge.

Let me know if you have any questions about this product...I'm happy to chat with you about it.

Til then, So long Dearies!


Ashley

Fashion Feature: Red Dolly Swimwear

$
0
0
I'm hoping to keep the ball rolling and continue to post to this blog weekly. Once a month, I'll be doing a fashion feature, like the Queen of Heartz feature I did last month.

June heralds the return of warmer weather and our re-entrance into summer activities. So a swimwear feature seemed 'suitable', if you'll pardon the pun.

Last year, I reviewed a few retro style suits on my Youtube channel and the video was well-received. Since my Red Dolly suit was one of the most popular suits in that video, and my personal favorite, I made it a point to order a two-piece option from Heather's company as well. This blog post will focus on that particular suit, but feel free to check out the custom one piece suit in the following video:


For Viva this year,my girlfriends and I decided to sport a 'nautical' theme at the Sunday Pool Party. In anticipation of that, I searched Heather's site for nautical option and immediately fell in love with the following suit:


Now mind you, I have not worn a two piece suit in well over 15 years, before I had children, so I was worried about that. But Heather assured me that the suit was cut to hide and flatter the tummy. Also, she advised me to get the cover-up skirt, so that I'd feel more confident by the pool, if I was still concerned.

I've also always loved those darling hooded beach jackets the ladies wore in the golden age, Clambake-style. So I commissioned one made from a 1950s pattern by my friend Belle, of Delinquente Clothing, that would flatter the navy and white Red Dolly pieces. I couldnt have been happier with the overall look!

The jacket and skirt provided ample protection from the sun, the wind, and my confidence issues.

I loved the deep, wide pockets of the cover-up and the hood was a great little 'plus'.

Needless to say, a skirt like this is a great way to ease oneself back into the two-piece pool, so to speak. The waistband is nice and wide, not constricting, and the skirt also adds a little more femininity to the look, since it is floaty and of a flirty length, unlike other swim skirts I've seen. Oh, and yes, the skirt is completely fine to wear into the water!

However, I was surprised to note that even without the skirt, I felt just fine in the supportive fabric and construction of the bottom half of the suit!


The most important aspect, I felt, was the fact that my tummy was sucked in Spanx-style, but the waistband didnt cause any excess 'spillage' over the top. You guys all KNOW how big a deal that is!

The Verdict:
Heather's suits are one-of-a-kind. They have a similar look to other retro suits,but I just think they're a little more thoughtful than most. I'm happy she is out there! And hey, she makes swimwear for little girls too...so there's also that cuteness to consider.


XXOO,
Ashley

(photos by Dustin Haverstick)


The Stylish Seventies- Yes, That's What I Said...

$
0
0
Recently, the cosmetics department at my place of work held an event celebrating the 'Fabulous Seventies', in honor of the brand Fashion Fair. All of us were required to dress in the style of the decade, which initially made me cringe, but I quickly got over that. After all, this ad featuring Judy Pace easily proves that the 1970s were not completely devoid of style and taste.


Newly inspired, I went on a mission to research fashion photos of the decade again, this time with ideas for our event in mind, and militantly determined to think outside of the 'Groovy' bell-bottomed, polyester encased box that has become synonymous with that era.

Although I didnt have a chance to film or photograph my final outfit choice for our Seventies event, I will say that this venture has reawakened my interest and a tutorial or two will likely be in the works that reflects that.

Right off the bat, let's just say this: There are some terrible terrible things that were released from Mother Fashion's bowels during this time. The late 70's were particulaly bad, culminating in what I feel to be the worst fashion years in history, 1980 and '81. (See my blog post here for more on that.)

Case in point:

Watch a few episodes of One Day at a Time or Three's Company and you'll see further evidence of this fact.

But that being said, even the late Seventies had an 'upside' or two. Annie Hall brought us a refreshing trend of oversized menswear which, although not physically flattering perhaps, was decidedly chic and adorable on many a young lady. Even Diane Keaton still sports it on a regular basis.


In addition, every decade seems to revisit the Golden Age of fashion and the 1970s were no exception. While the 1980s failed miserably when it came to the '80's does 50's' trend, for the most part, the Seventies brought back the 20's and 30's with great success. The earlier part of the decade saw a return to large floppy hats, slim-through-the-hip high waisted trousers, cropped sweaters, peter pan collars, and turbans.


There is something decidedly Hepburn about the following sporty fashions:

And I have to admit to being a big fan of the following midriff baring choices, on the right girl:

When researching hair and makeup, the former was usually neither here nor there, with the exception of a few stunning 1920's/1930's inspired bobs and some fabulous afros.


One of the best parts of the decade though, is the makeup, which was by turns painstakingly natural or colorfully indicative of silent film. In both cases, the lashes are the star, either because they are defined and detailed to distraction or because they are almost nonexistent!


If necessity calls upon you to visit this decade of fashion and like me, you are a different kind of vintage gal, blissfully stocked up on all that you thought were the antithesis of such things, this blog will hopefully help you reexamine that. I learned that my 1940's trousers could double as Annie Hall-wear really easily, when paired with a wide tie and a man's shirt. My Audrey-esque sun hat looked very Dunaway when I bent the brim differently. A few carefully applied individual bottom lashes, a subtle and slick lip gloss, and some bronzer went a long way in creating a very accurate 70's makeup. Even fighting the urge to set my hair and embracing it's stringy natural texture proved oddly liberating.

And I didnt even have to break out a lava lamp.

XXOO,

Ashley


A Few of My Favorite: 'Philosophy' Things

$
0
0
This is a new blog series I'm testing out for you. Since I'm now in the position to try a few more brands that are considered 'high end', I thought I'd lend my opinion, since I know how difficult it is to know whether something that is more pricey is worth an investment or if a less expensive drugstore option would suffice. So I've compiled a list of my favorite products from various brands to clue you in on that kinda stuff.

Philosophy is a brand that I've always loved, even with limited experience, and now that I can honestly say I've tried almost everything the line has to offer, I can share my opinions with you as to which products are worth the (sometimes hefty) price tag. Bear in mind that I am basing these opinions (for what they're worth) on my own skin type (which is very dry) and needs. Your personal experience may be different than mine but this is just a general overview of these items and is meant to guide, not to direct.

So without further ado, here are my top ten Philosophy products, counting down*:

10. Miracle Worker Overnight (68.00):

The only item on my list from the 'anti-aging' options by Philosophy is the Miracle Worker Overnight. This is an intensive moisturizer that claims to work with sleep to visibly 'reset' your skin and lend a more youthful appearance. One of the things that I like about it is as that when compared with similar products from other brands, it is significantly more affordable and still maintains the richness and efficiency of the pricier night creams. It does not contain the more expensive peptides etc that hike the price up with the other guys, but this still packs quite a punch when it comes to providing an intensive and therapeutic amount of moisture that still leaves the skin feeling supple and soft in the morning.


9. Pink Melon Sorbet Whipped Body Souffle (22.00):

Though I've always been a fan of fruity body lotions and gels and literally used to have a 'Bath and Body Works' smell for every day of the week in my shower, I've gotten away from that over the years. This one really brings me back to that frame of mind. It is the most delectable and mouth-watering melon fragrance anywhere. Everyone who opens the lid sighs with delight and it flies off our shelves, as a result. Think Watermelon Jolly Rancher reimagined as a silky smooth body lotion and this is what you get. The large container goes a long way and is absolutely worth the money. Use it with one of the creamy vanilla scented body washes to really up the 'sweetness' quotient.

8. Deep Fill Fix (34.00):
Having only used this a few times I can't vouch for the 'long term' benefits of this product, but I do know that when applied to my deeper 'frown' lines, the result is an instant softening that gives me the boost of confidence I need. To clue you in on the consistency, I would say this is sort of a mix of a silicone based primer and a heavy duty eye cream. A tiny bit goes a long way and this product also contains ingredients that diffuse light, so the skin around the problem area is also placed into 'soft focus'.

7. Fresh Cream Body Lotion (17.00):

Another product you'll want to eat. This lotion contains macadamia nut oil, fruit oils, and antioxidants so the quality of the ingredients is almost more impressive than the scent. But not quite.

6. The Microdelivery Purifying Enzyme Peel(42.00):
I have never been big on 'peels'. They hurt and they're time consuming. And I feel that the payoff is rarely worth it. This is a little different. It works in 1-3 minutes and results are instantaneous. After a mere 60 seconds of only a little more than a tingle, my skin was left feeling slickly clean and looking remarkably radiant. Perfect for an afternoon treatment just prior to a big night out!

5.Unconditional Love Fragrance Spray (46.00):
This is the fragrance spray I enjoy the most by Philosophy. It's very light and subtle, reminiscent of blueberry pie. My husband loves 'food' smells so it's a clear winner in our house. The longevity is definitely an issue for me; I can't smell it anymore past an hour or so, but I have it on good authority that the fragrance does linger and others will smell it long after you think it's faded.

4.The Microdelivery Exfoliating Daily Wash (40.00 for the 16 oz size):
When it comes to a daily exfoliant, I'd be hard pressed to think of a better one. This non-foaming cleanser contains tiny granules that gently and effectively resurface the skin without feeling overly harsh. For added sloughing, it can be used in conjunction with your Clarisonic or other cleansing brush. Older ladies absolutely love this and repurchase it again and again as part of their regimen, I've discovered. The fact that it's sulfate free is an added benefit.

3.When Hope Is Not Enough (50.00):
Hope in a Jar is one of the most popular moisturizers in the world, but I prefer this one from Philosophy. Although it is promoted as being great for mature skin, younger gals with dry skin will also appreciate the replenishing aspects of it and the gentle absorption it as to offer. It also protects against dehydration, maintaining the skin's moisture balance throughout the day. I used this as a primer, to help my BB cream blend more efficiently, and I never noticed it becoming oily or my skin feeling tight over the course of the day.

Purity Made Simple Facial Cleansing Oil (25.00):
If you are a cold cream user, and you'd like to invest in something that's sort of an upgrade, this is your answer. This mineral-oil free blend of natural ingredients nourishes the skin as it dissolves makeup, leaving it feeling soft and completely free of residue. I adore it as a pre-cleanse, using it in the same way as I use my cold cream, and removing it with a tissue before my exfoliating cleanser at night. While I can't use the Purity 3-in-1 cleanser that so many adore, this suits my needs beautifully and since such a little goes a long way, I feel it's well worth the reasonable price. Incidentally, I also have used olive oil, coconut oil, and almond oil in the same way; I like this much more.

1.Hope in a Jar A to Z Cream (38.00):
If there were any product by Philosophy that should be accompanied by choir music and the Hallelujah Chorus, this would be it. This correcting BB Cream is by far the product I recommend and sell more than any other in my department. I'm not sure what makes it so much better than any other BB cream or tinted moisturizer I've used, honestly. I've researched and read over the ingredients repeatedly and can't see a lot of difference when compared to other creams. So I have to assume that Philosophy just has the formula part down, in the way they mix it up. The cream comes in three universally flattering shades (even relatively dark skin tones can wear the Dark shade without that 'ashy' effect) and the coverage is sheer, buildable, and effortlessly blendable. The finished texture is smooth enough to be ideal for mature and wrinkled skin but velvety enough to work for oily skin, especially when coupled with a mattifying primer. I recommend this in place of foundation for day or evening, perhaps coupled with just a little concealer. It evens out skin tone, holds up well in humidity, and has virtually no fragrance to speak of. Basically a dream product.

So that's my list! I hope some of you found it helpful. Let me know if you have any questions about the rest of the line and if you're in the Memphis area, come in and see me at Dillard's so we can try this stuff out!

xxoo,
Ashley


photos courtesy the Philosophy website. I do not own these images


The Art of Style

$
0
0

Over the years, I have developed quite a little collection on my computer of art that I've discovered or rediscovered. One whole folder is dedicated to styling in art, paintings in which styling is the central feature or inspiration. I think it's interesting that to this day, ladies in varying states of 'undress' or 'dressing' maintain their appeal and continue to inspire artists worldwide.

Here are a few of my favorites...many of them were created understandably by Pin Up Artists, who have been celebrating the feminine lifestyle for decades. But some are 'fine' artists who were likewise moved to capture the aesthetic of beautifying oneself.

A New Hairstyle: by Norman Rockwell (1927)

Young Woman at the Mirror: by Berthe Morisot (year unknown)

I believe the following painting is supposed to depict a boy's first haircut, though I've always assumed it was a little girl. Being that it was painted in 1918, it's unlikely that a little gal would be getting a haircut or that her mother would condone such a thing.

The Haircut: by Norman Rockwell (1918)

Edward Degas (year unknown)

Waterhouse painted some of the most lyrically beautiful pictures of ladies at their toilette.

The Mermaid: by J.W. Waterhouse (1848-1917)

Mariana in the South by: J.W.Waterhouse (1897)

Woman at Mirror by Max Beckmann (1918-1920?)

Before the Date by: Norman Rockwell (1949)

by: Vaughan Aldan Bass (1940s?)

Woman Before the Mirror by: Titian (1515)

More Norman Rockwells...

Girl at Mirror (1954)

Going Out (1933)

More Pin Up Goodness:

Gil Elvgren (1950's)


Joyce Ballantyne (1945-1955)

Ernest Chiriaka (1953-1957)

Joe De Mers (year unknown)

Edward D'Ancona (1930s)

K.O Munson had some amazing pieces (no pun intended) and his work is often overlooked in the Pin Up field. The backing sketches make them especially frame-worthy.


Hopefully you enjoyed this little art show and it has further inspired you to set up an area that lends itself to creativity as well. Nothing else makes you feel quite so lady-like as a designated dressing room or table. :)

xoxo,
Ashley

This post is sponsored and inspired by Kelly Grace Art. Make sure to visit her site by clicking the link to the right or here in this article.


Reviewing: Tressmerize Extensions

$
0
0
Ssometimes things just work out.

A couple of months ago, I was hemming and hawing, trying to figure out how to go about doing some of the long haired styles I wanted to try but knowing all too well that my Glamtime extensions were the wrong color and a new investment would likely be necessary.

Enter Tressmerize.

The owner of the company was referred to me by a friend, and asked if I wanted to try out her amazing luxury extensions for the purpose of review...Yes, please!! After all, the extensions are created specifically for shorter or fine hair, and include a (gulp) HAIR TOPPER too! What is hair-topper, you may ask? Well, think Ginger of Gilligan's Island, or Jane Fonda in Barbarella, and you can see why this idea appealed to me. See, a 'fall', which is what those ladies were known to wear, was typically a partial wig that was worn at the crown to give extra volume and that signature '60's' bombshell look. While this product is not really MEANT to mimic that era, with just a tiny bit of coaxing it certainly can. The topper is actually a tool for hiding shorter upper layers, and it works beautifully for that. But since a 3/4 wig nowadays in natural hair can run upwards of 300.00, this set of extensions is also a godsend for retro gals like me.

My mind began to whirl around the possibilities, when I got the product in the mail. Jane Fonda...Michele Carey...ooooh, what about Dorothy Gish? These are all possible with the new extensions so pardon me as a swoon and rave for a moment...

While Tressmerize doesn't have a huge color range, I was assured that they are virgin hair and easily colored. Which is lucky, because they were totally the wrong shade for me. The site doesn't have very good photos currently of the different color swatches so I took the owner's advice with the ones she sent and I'll admit I was a little concerned. They were a very basic yellow blonde, sort of like when you first bleach a full head of hair to the yellow stage, before toning.


The texture was silky and the clips were very sturdy...all in all, I'd say these are the best quality clip-in extensions I've used yet. I was skeptical that such a silky texture of hair would hold onto the color I'd inevitably have to apply...but try it I must.

In the interests of budget, I chose a super-duper cheapo brand of hair color, that 'Balsam Color' stuff you can get for like, 3 bucks at the grocery.


And lo' and behold, they turned out to be the perfect shade of dark honey blonde that matched my hair! Such a fortunate thing!!

Dutifully, I pin curled them and laid them out to dry so I could prepare them for my trial run.


Unlike my Glamtime extensions, which became somewhat dry and brittle after coloring and setting, these maintained their silky texture even after the process, which was another huge relief. I honestly couldn't have been more impressed with the actual product and was anxious to get started styling them.

My first endeavor was to re-create an 'Aurora' sort of look, for my Animated Angels series.


The look had previously been done on my channel using just my own shoulder length red locks, so I was anxious to do something a little more whimsical, but still wearable. I was very pleased with how easily the extensions installed, blended with my hair, and styled. The overall look came out pretty well, and I was pleased to add the video to my playlist of options for channeling animated ladies in a more realistic way.


Enjoy the video tutorial, below:


To sum up, Tressmerize is a great product, and well worth the price tag (the full set is 297.00, which is still less than a 3/4 wig in human hair and far more versatile).

And that's my opinion.

xxoo,

Ashley


The Lady Wore the Pants

$
0
0
Lauren Bacall will long be remembered as a formidable presence, both onscreen and off. When we lost her last month, I thought about how she had shaped so much that we've come to understand about the female celebrity, including the perception we've had since, about female starlets and how they should behave or dress. There's so much to be said for a young lady who isn't afraid to be herself in spite of the public's perceptions and Lauren was never fearful of what others might think, throughout her career. It's for this reason that I decided to dedicate this particular blog entry, not to her best movies or even her fabulous hair (which is destined to get a feature of its own), but to her pants.

In the 1940's, the world was at war, as all of you know, and fashion was wholly influenced by this fact. While long, flowing evening gowns and palazzo pants were still in style, they were largely worn by the celebrity elite and even then, only on certain occasions.

Gene Tierney in palazzo pants, 1940s'

The reason for this was simple. Fabric and clothing were rationed. The least amount of fabric that went into a garment, the more 'responsible' the designer. Therefore, the 1940's saw a drastic simplifying of clothing. Skirts were shorter and slimmer, pants and shorts were considered a necessary choice for work or play, and firm undergarments were almost nonexistent, especially considering the amount of rubber and wire that went into creating the average girdle.

Here are a few examples of the easy style of the 1940's as worn by the every-girl:

(1940's winter fashion also consisted of 'unisex' attire as women repurposed mens' clothing to fit them.)

(A rationing ticket was given to each person, allowing them a certain number of clothing items a year.)


Not to say that there were no elaborate clothing options in the decade; ladies were still fashion conscious and wanted to stand out. But even higher fashion options were more austere than in years past or since, focusing more on pattern than flow:


Evening wear was slimmer and draped in such a way as to highlight the female form without the need for girdles or underwire. Many stars even wore sensible suits to social gatherings, opting to don a more elaborate hairstyle or hat in honor of the formal occasion :

But I digress.

Since the majority of women were closely involved with the war effort, even going to work in factories to support their husbands and fathers overseas, the fact that some of the world's most successful actresses were already sporting a casual style made them feel more like a unified team.

Katherine Hepburn was an advocate of slacks, even before necessity made them more practical:

Betty Grable and Ginger Rogers sported them often:

But Lauren made them effortlessly elegant like no other. Coupled with her loosely maintained hairstyles and husky voice, they only accentuated the attainable femininity that so many desired in those stressful times. Women no longer felt as though they had to have two wardrobes: one for work and one for public outings. Now it could be chic just to be a healthy woman with a family. And for this reason, I feel like she did so much more for mothers and wives than just provide style support. She provided moral and sense support as well.

To close, here are some of my favorite photos of Lauren, showcasing her signature look but also that no-nonsense quality I loved about her:


Thanks, Lauren, for wearing the pants in the family.

XoXo,
Ashley

_______________________________________________________________

This post is sponsored by Heyday Vintage Style Clothing, linked in the sponsor column to your right. In additon to gorgeous 1940's style slacks, there are also an array of dresses and blouses to choose from. Inspiring options for all of us who love the era. Please show your support by clicking the link and giving them a browse!


Product Praise: First Aid Beauty (FAB) Eye Duty Triple Remedy

$
0
0
I couldn't help but post a quick gushing review of this product. As some of you know, I am currently only doing product reviews on my blog, so hopefully, ya'll will be able to spread the word about that since I know a lot of people have commented on my lack of reviews for Youtube. In all honestly, I feel that 'less is more' when it comes to videos so I'll be only doing occasional reviews there, most of which will be in support of clothing lines or websites I find interesting.

Anyway, back to the product review.

I received a full sized version of this product in a complimentary bag handed me at a recent work event for Dillard's 'Edge Beauty'. I've been with The Edge shop for a few months now but this was my first training class, and evidently we get nice amount of gratis at these events. First Aid Beauty is a line I was unfamiliar with since we don't carry it at my store but I'll admit to being intrigued after using this.

The product is in a squeeze tube, as pictured, and features a metal applicator that supposedly applies pressure that is ideal for the eye area, as it mimmicks the shape and size of the ring finger. To apply, you squeeze the tube gently, releasing a small amount of the product, about the size of this 'O'. :) Next, dot the released amount beneath the eye and use the applicator to gently massage it into the delicate skin, using small circular motions.

The description on their website makes the following claims:
Eye Duty Triple Remedy is a complete eye treatment that instantly erases dark circles while delivering serious long-term skin care benefits to the orbital eye area. Upon application, it instantly brightens the entire eye area with a soft universal tint and light reflecting pigments that create an illusion of bright, smooth and youthful skin. Over the long-term, actives in the formula significantly improve the appearance of undereye puffiness, dark circles and fine lines. The unique stainless steel applicator, which mimics the shape of the pinkie, delivers micro stimulation to the area while flawlessly blending the product into the skin. The results are natural and youthful. Eye Duty looks and feels like a second skin.

Eye Duty Triple Remedy is packed with a host of age defying ingredients. Retinyl Palmitate and GABA support the skin’s natural collagen production to reduce the appearance of fine lines and wrinkles. Licorice Root reduces the appearance of dark circles. Caffeine enhances blood flow to the eye area to minimize puffiness and Coralline Extract, a red algae, conditions and nourishes.,


My thoughts: I can honestly say that this product lives up to its claims, instantly de-puffing and brightening the under-eye area significantly. The cold metal applicator does a bang-up job in contributing to the former, as I can see that the puffy morning eyes I am so accustomed to are minimized instantly when I use it. The creamy flesh-toned product has no chalky appearance and feels more like an eye cream than a concealer, with the benefits of both. My undereye area responds with immediate radiance and after repeated use, feels firmer. So it's a sure winner, with me.

Although the site claims that the product is suitable for all skin types, paraben free, and sensitive skin-safe, I only use it once a day: in the morning after I cleanse and moisturize, and before I apply my foundation or concealer. I find that I only have to use a small amount of concealer, which is another big perk for me, since as my eyes mature, it becomes more and more evident that a minimal amount of product is always better to prevent settling into those fine lines.

Cons: The only con I can think of is that at first examination, the top appears to be a twist-off cap, which it is not. If you attempt to hold the tube and twist the cap, it is quite likely that a bunch of the product will squeeze into the closed cap, inevitably wasting it and making a mess. The cap is in fact just a 'pull-off' type, so no squeezing of the tube is necessary to remove it. Simply grasp the bottom of the tube and gently pull the cap free. I know this seems like a no-brainer but hey, I screwed up so I thought I'd share.

Let me know if you have any questions about this product, on Facebook, Instagram, or here. I'm happy to help.

Click here to visit First Aid Beauty's Website product page for this item.

Price: 36.00 is the standard retail price. I have not found it cheaper but please let me know if you find a special!

Thanks for visiting!

xxoo,
Ashley

The Way We Used To Roll-Vintage Hair Tools

$
0
0
I have always loved seeing health and beauty tools/appliances as they've progressed over the years. Beauty and wellness is an age old obsession, one that we aren't likely to get over any time soon. Not that it's a bad thing to desire health OR beauty, but the lengths men have gone to in order to achieve greater heights in these respects are very interesting to me. Some tools, like the permanant waving get-up pictured at the head of this entry, seem so ludicrously bulky and extravagant. We can only imagine how expensive that must have been to manufacture, much less the cost that would have been involved in having it done regularly. But as hilarious as such things might be to us now, we are presently faced with even more options than ever before, when it comes to hair tools and devices.

Here are a few little fun bits about hair tools, over the centuries, as researched by me:

In Ancient Egypt, ladies and gentlemen utilized many accessories such as the gorgeous comb,shown below.

But other than accessorizing, there was little need for hair tools. Braiding was a principal means of styling the hair, for both men and women, and were accessorized with gold circlets and the aforementioned combs, as well as extraordinarily carved pins that served to hold and beautify the coiffure.
Shaving was king, for both bodies and heads. Tools for cutting and shaving have been discovered among the ruins of slave habitations and kingly residences.


Hollywood depictions of the hairstyles sported in this time are probably somewhat close to the actual look of them, but also really bring home the excessive nature of the heavy head dresses and accessories that were worn by the royal folk.

The tools used for creating the elaborately conceived styles common in ancient Athens and Rome were likewise very simple, with even more basic accessorizing.
Braids were again the classic choice, with elaborate designs being indicative of upper class and nobility.
In the ages before hairpins or bobby pins, simple needle and thread was used to hold and maintain these heavy braided styles, as is beautifully demonstrated by historical hairstylist Janet Stephens in this video. Make sure to check out the rest of her videos for more period-authentic styles.


Flowers were common accessories, as were combs and decorative ivory pins and bodkins.


Ancient China and Japan also used bone and ivory pins and sticks to style their hair. Hair ornaments were painstakingly crafted and
placed into elaborate rolls and curls to accentuate their volume and 'crownlike' appearance.
Women grew their hair long to accommodate these styles but never wore it loose in public. In Chinese culture, a Buyao ('shake as you go') was a common accessory to create an attractive and coquettish bit of interest.

Bones, beads, feathers, and flowers serves as ornaments for hair dressing in the tribes of Africa and North America.
Crude razors and shears have been found from the early American tribes, but for the most part the hair was grown long and styled using products made of vegetable oils and animal fats. Braids and hair designs were sewn into place as with ancient Rome, or positioned with bone pins.


From the 14th to the 17th century, excessive behaviors in styling were becoming commonplace in Europe. The aristocratic women and men went from shaved hairlines (to create a broader forehead, very much in fashion in the renaissance), to elaborate headdresses and braids, to pompous wigs and curls.
Combs and tools were made of ivory,silver, and bone, but beautifully carved and taking a place of prominence in boudoir decor. Powders and dyes became popular as beautifying aids for the hair and more products were being developed, not only for styling, but for scent. Curls were desired by all, particularly in the 18th century, so new ways of obtaining them were conceived. The earliest curling tongs were crude and laid directly over a heat source before use, making damaged hair likely, but worth the risk. This photo shows an idea of what they may have looked like, although I'm unsure of the date of these:

Curls were also popular using the Papillote method described here. The method works well as a cold-set, even for 1940's pin curled styles.


The Victorian Era saw a return to simplicity and less extravagance. Hair was long and more simply done, using braids and simple curling methods. It culminated in a love of 'sausage-like' curls that gave way eventually to the classically styled bobs of the 1920's and 30's, when women wanted to showcase their independance and modern sex appeal.

The clamps and tools used to shape hair into those stunning finger waved styles we love from the time period, are still used by many retro stylists today and are really not much different.


As curls became more and more a part of the elegant look of the day, more advancements in curling techniques and products were made. Although we may not recognize some of them at first glance, almost all of the tools used for styling during this era have a modern counterpart. That's one of the most interesting things about styling history, to me, the way that almost everything 'comes back', even from the most obscure and 'gimmicky' looking items. Here are a few things that refuse to quit, because frankly, they still work.

Waving Irons:

An old fashioned Marcel waver, probably from the early to mid-twenties

Modern triple barrel waving iron by Revlon

Curl Clips:
Curling Clips from the 1940s

Modern double pronged alligator clips

Bobby Pins:These were conceived in the 20th century, principally for holding a classic bobbed style in place. They have hardly changed, as you know.

Hair 'Rolling' Tools:
Solo Hair Roller-1940s

Sarah Potempa Wrap Up-Modern

Pin Curling Tools:

Pin Curling Tool-1940s

Modern Sculpture Pin Curler*

Spool-Style Rollers:
1950's Era Spoolie Roller

Clairol Lock n Roll Rollers (Remember those? They're not 'modern' really, but they've gained a lot of popularity in the vintage community lately because they do a great job mimmicking a pin curl.)


Curling/Perming Rods:
1940's(?) metal curling rods

Modern plastic perm rods

In short, we've come a long way, baby. But then again, we haven't.

xxoo,
Ashley

*This post is sponsored by Vintage Hair, the creator of the modern sculpture pin curler. Visit the website here to purchase your own, as well as other great vintage styling goodies.


Viewing all 103 articles
Browse latest View live